
We all love our friends and we love to see them happy, and what's more loving than creating something unique for their special day?
In this tutorial I will teach you how to make a unique, flat design wedding icon, but please feel free to create your own and use this tutorial only as a reference. Make someone happy!
1. Choose a Photo and Colors
Choose the best photo of your friends to see the basic shapes of their faces.
Find out the colors your friends are using in their wedding. For Ilona's and Tom's wedding it was light blue #9BD4D7.
What's special about your friends? Do they have pets, interesting hobbies, etc.? In my chosen photo, my friends had a cat in their hand, so I placed it in the middle of the icon.


2. Set Up the File
Create a new 600 x 600 px document and use the Rectangle Tool (M) to create a background shape in color #F4F3ED.
3. Create the Background Shapes
Step 1
Let's start with the diamond shape.
Take the Rectangle Tool (M) and create a 174 x 174 px shape (color #D2EAE5 and stroke 2 px with color #2C2C2C) and rotate it 45°. Using the Direct Selection Tool (A), click on the rectangle and round the corners using the handles on both sides.


Hold Alt and drag the mouse up a little to duplicate the shape and create a slight shadow. Use the fill color #E8E8E8.


Using the Ellipse Tool (L), create two 7 x 7 px circles (fill color #7CC9CD and stroke 2 px with color #2C2C2C), and place them at both corners of the diamond.


Step 2
Let's create a heart.
Basically the heart consists of three rectangles. So take the Rectangle Tool (M) and create three 7 x 7 px rectangles using the same color as for the little circles. Place them as you can see in the picture below.

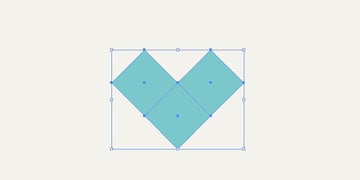
Using the Pathfinder panel, choose the Unite option to merge them all together. Add a 2 px stroke with color #2C2C2C. Place it on the top of diamond.


Step 3
Using the Pen Tool (P), create a shape like below:


Right click on the mouse, and Transform > Reflect > Horizontal > Copy.


Put both shapes together like this


With both shapes selected, take the Direct Selection Tool (A), right click on the mouse and select Join.


Keep the stroke 2 pt and the shape 175 x 45 px
Using the Rectangle Tool (M), create two 28 x 28 px rectangles and place them on the sides.


Group the whole thing and using the Direct Selection Tool (A) select the corners as shown in the picture, and round them as we did before.


Select the shape and take the Eyedropper Tool (I). Click on the heart icon to select the same color and stroke.


Step 4
Put everything together and write the names and date. Using the Pen Tool (P), create strokes as shown below to add some details to the design. Small details are very important to make the design come alive. But never get too carried away with that.


4. Create a Couple
Step 1
Using the Ellipse Tool (M), create a 34 x 34 px circle and delete the upper point. Take the Pen Tool (P) and create a shape as shown below. Fill it with #EFE6D8.


Step 2
This part is a little bit tricky. You will have to use your Pen Tool skills. Take the Pen Tool (P) and create hair similar to what I have done. Fill color #E8E1C5.
Use small circles and the Pen Tool to create the eyes, nose, mouth and details in hair.


Also use the Pen Tool to create the body. Use the fill color #8A9BA0.
Follow the same process with the guy. Use circles to create his ears. The body should be #61686B, and the hair #8C867E.


For the cat, create a 47 x 47 px circle and fill with #E4EAF0.
Use the same stroke as for everything else. Follow the steps below.
5. Create Shadows and Highlights
Step 1
This last thing usually makes the design go from OK to great!
So as easy it is, select white color, take the Pen Tool (P) and create white light everywhere you want, but keep in mind that you should do it only on one side.
As for shadows, copy the shape that needs shadow, and use the Pen Tool to create an irregular, slightly darker shape around it. Select both shapes and go to Object > Expand and click OK. Select both shapes and click Divide in the Pathfinder panel, and take the shadow part out with the Direct Selection Tool (A) and put it on your original design.


Awesome Work, You're Done!
I hope you enjoyed my tutorial and learned something new! Let me know if you actually made your friends a special wedding icon!
See you on the next one!


